Archive for the ‘Windows Server OS’ Category

Tip: Optimizing Windows Server 2012 (R2) or Windows 8(.1) for VDI/Terminal Server use

Wednesday, March 18th, 2015

Hi Folks,

Citrix already one year ago released in article with several optimizations for Windows Server 2012 (R2) and Windows 8(.1) to optimize these systems for VDI / Terminal Server use. A lot of people doesn’t know it and it can be really helpfull, you can find the article here and it also include a .vbs script to run all these optimizations in one step. It will work for Citrix and also other solutions and can be very usefull to improve the user experience in general.

Just try it!

Cheers

Michael

Info: What clients can be used with the Windows Server 2012 Work Folder feature?

Monday, February 23rd, 2015

Hi Folks,

very often asked during workshop’s, what Clients can be used with the Windows Server 2012 Work Folder feature. Currently the following Desktop/Mobile OS’s are supported:

– Windows 8(.x) x86 and 64-Bit and Windows RT: Work Folder support is coming directly with the OS.
– Windows 7 x86 and 64-Bit; Work Folder support needs do be downloaded from here and to be installed.
– Apple Ipad (IOS): Work Folders app for devices is available in the Apple store

Still unsupported:

– Windows Phone 8(.x)
– Android
– Linux
– Webbrowser based access

It’s quite funny (no, not really) to see how Microsoft create good features/products and directly do the best to kill this advantage by not providing a client for several major OS’s in the same or nearly equal way.. Similar to the still existing Remote Desktop Gateway gap for Windows Phone or a missing Lync/RDP Client for Linux. Before talking about cloud as the future of Microsoft it’s maybe helpfull to unterstand that “cloud” means a bunch of end devices and it still seams that Microsoft did not realize this small but important fact. ..don’t misunterstand me, i really like these features/products but i really don’t like to explain customers/users all the time why they can’t use these features in there infrastructure regarding the lack of a well developed client infrastructure. Maybe it will be better with Windows Server vNext… …or Skype for Business. 🙂 Maybe iam also to spoilt by the existing Citrix client environment… 🙂 🙂

Cheers

Michael

Tip: Using Windows Server 2012 R2 workfolders with Remote Desktop/Citrix XenApp based Terminal Servers/VDI’s

Monday, February 23rd, 2015

Hi Folks,

already a year ago I wrote an article how you can change the default port for the Windows Server 2012 R2 workfolder role/feature. By default the Workfolder feature works a “sync” share for Windows 8.1 based desktop systems/VDI’s like a self hosted OneDrive/Google Drive. In the article here i’ve also mentioned that these Workfolders can be mapped to a Terminal Server based on Microsoft Remote Desktop Services and Citrix XenApp.

I got a couple of request how the setup should look like so here is a small guide.

1) Install the Workfolder feature (can be found in the file server roles setup) to a Windows Server 2012 R2, make sure that no other feature or application block the SSL Port 443 or modify the Port by following our guide here. During the Workfolder configuration you will be ask what “folder” name should be used, username or username@domain; use username here only.
2) After the workfolder setup is done create a new smb fileshare pointing to your workfolder directory, make sure to setup the exact similar user rights like set for the original workfolder directory. Open Windows Explorer at the Workfolder Server and check the User Rights for the Workfolder and adopt this configuration for the Workfolder Share. If not done right you may mismatch the Userrights and Users may can access files from other Users or loose the Workfolder access.
3) After this is done open the Group Policy Management Console (GPMC) and create a new policy linked to your Terminal Server OU
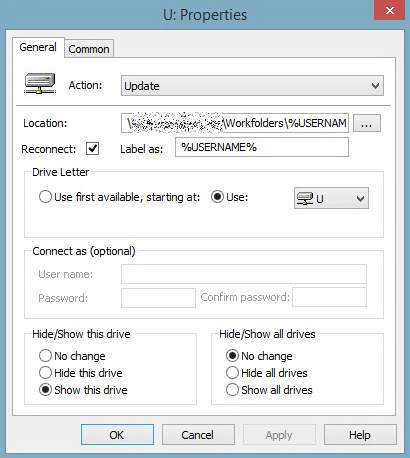
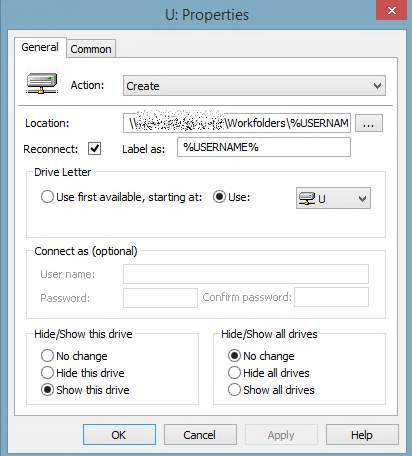
4) Edit the new policy and browse to User Configuration->Preferences->Windows Settings->Drive Maps and create two new mapping entries, in my sample i map the workfolder shares to drive U: (Click picture to enlarge). Location should be always \\*your_workfolder_server*\*Workfolder_Sharename*\%USERNAME%.

Create the share configuration

Create the share configuration

Update the share configuration

Update the share configuration

Final view

Final view

5) Close the policy and logon to a terminal server to verify the configuration, all modified content within the drive U: will be synced to the user devices and vice versa.

Cheers

Michael

P.S.: This can be also used with any Microsoft Desktop OS based VDI if you want to use the workfolder sync feature only for physical devices (which make sense to prevent double data in the Workfolder Share and the User Profile/Personal VDisk). If you install the file resource manager to the Workfolder Server to set quotes (like 250MB availabe space per User) make sure to set the similar quote also for the fileshare!

P.S.2: The screenshot’s are coming from a production environment, that why the location path is pixeled.


Tip (Update): Setting the Startmenu for Terminal Server Users working with Windows Server 2012 R2

Monday, February 23rd, 2015

Hi Folks,

maybe you noticed already that the handling for the Startmenu is very different between Windows Server 2012 R2 and old Windows Server versions like 2008 R2 and so on. These configurations will also work for Windows 8.1 incl. Windows 8.1 RT (Require enabled Group Policy Client service or local Policy setup).

A lot of Administrator want to modify the Startmenu and to offer a standard view for all User, this can be a very tricky task and i saw already a lot of funny way’s how to edit it. To clear this up a little bit i would like to suggest you two ways how this task can be done, the first variant will introduce you a “static” way. Static means the User will get a “fixed” Startmenu without the ability to change something here. The second way will introduce you a way to create a “default” Starmenu  that can be modified by the User. So you can figure out which way works best for you, depending on the scenario, for example if you deploy Terminal Server thru Citrix Provisioning with an static base image it doesn’t make sense to give the User the ability to modificate the Startmenu in any way. These configurations can be done thru local and/or domain policies.

Way 1 – Static Startmenu for all users

1) Login as User with Administrator permissions and install/setup all Applications you want to provide to the user.
2) Setup Starmenu like it should be “published” to the users.
3) After you have finished the final look and feel create a new SMB Share on any fileserver in your environment, call it “startmenu” or something similar.
4) At the server where you have created the Startmenu “User” view open the powerhell with administrative permissions and enter the command: “Export-StartLayout -Path \\*yourfileserver*\*sharename*\StartMenu.xml -As XML”
5) Logoff from the Terminal Server and start the GPMC (Group Policy Management Console) on any domain system where the GPMC is available.
6) Create a new policy (or use an existing Policy) and link it to the OU where your Terminal Server Users can be found and click the right mouse button->Edit.
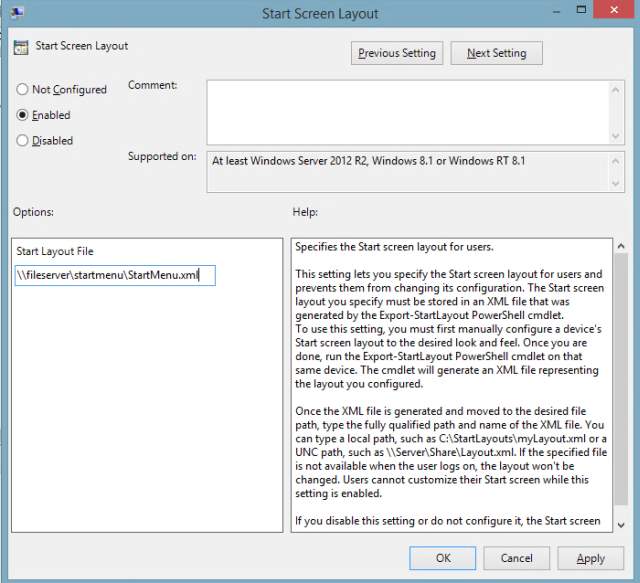
7) In the policy browse to User Configuration->Policies->Administrative Templates->Start Menu and Taskbar and edit here the setting Start Screen Layout.
8) Enable the policy and set the Start Layout File to the file you have created in 4) = \\*yourfileserver*\*sharename*\StartMenu.xml

startmenustatic

9) Close the policy and make sure the policy is assigned to the right OU, after this login to the Server and verify the result.

Please note: The Startmenu can not be modified thru a User! For the Export-StartLayout command (4) you have to use the XML format for the export, the bin format can not be used thru the policy! If you assign the policies to a Computer OU like your terminal servers don’t forget to enable loopback processing!

Update: I forgot, Applications where the shortcut is not listed in %ProgramData%>Microsoft>Windows>Start Menu may dissapear after the second User Login (Notepad, Internet Explorer default entry as example). So you may have to create the Shortcuts by your own and assign it to the Startmenu before exporting the XML file. In this folder you can also setup the Applications that should be shown to the User in the “full” Starmenu applications view by editing the User permissions for each file and folder in a very simple way. As example if you want to hide the Windows Store disable the permission inheritance and set the User permissions to full access for “Domain Administrators”, “System”, “Administrators” and add the Usergroup(s) which should be able to gain access to the Applications thru the “full” Startmenu view (Arrow down button in the Startmenu). If you want to be more secure regarding the general Application access you can also combine this with the Windows Applocker feature.

Way 2 – Flexible default Startmenu for all Users (Source: Microsoft Platform)

There is also an alternative described here: Microsoft Platform, this way allows also provide write access for the users but it’s a little bit tricky to set it up and can cause issues in production.

I personal do prefer Way 1 which make more sense for the most scenarios, so i do provide only the link to the source.

Cheers

Michael

cloud-client.info Remote Desktop Services Configuration Tool Beta is now available for download

Monday, February 16th, 2015

Hello Folks,

if you are looking for a small tool to simple configure a bunch of Microsoft Remote Desktop Service settings for Windows 8 (.1) or Windows 2012 (R2) than you should try our latest Tool “Remote Desktop Services Configuration Tool” which is now available as public Beta.

Remote Desktop Services Configuration Tool 1.0 Beta

The tool can also import and export settings, as example to switch settings very fast between different system’s or to adopt a configuration from a production system to a trial system and so on.

As written RDSCT is currently a Beta Version and a bunch of settings will follow with upcoming releases (and depending on my time). The source is already more than 16k lines of code and i don’t have always the time to add new features as i want to do it. 🙂

The download is available here: Remote Desktop Services Configuration Tool

Have Fun

Michael

P.S.: Please report bugs or settings you want to see in later versions to us, see readme.txt for details.

Windows Update KB3013455 breaks Font Smoothing on Windows XP, Server 2003R2 and 2008

Thursday, February 12th, 2015

Hello Folks,

if you are using Windows XP as VDI or have old Terminal Server’s (incl. Citrix solutions) running Microsoft Windows Server 2003R2 or 2008 (32-Bit) you should not deploy KB3013455 which was released during the last Microsoft Patch Day.

The Update will cause a general font smoothing issue with a bunch of fonts and the users will/can get a much lower user experience if working with a lot of text content.

There is currently no work around for this issue, Windows Server 2008R2/2012(R2) and Windows 7/8(.1) do not show any issue once the update is applied.

The issue is already confirmed by Microsoft, read also here: MS15-010

The MS15-010 article currently doesn’t mention Windows XP (or Vista) but i was able to reproduce it also with a Windows XP 32-Bit VM.

Cheers
Michael

P.S.: Some Users also reporting issues with Windows Vista 32 Bit but i believe this is less important for VDI environments.

Windows Server vNext will not be available before 2016

Saturday, January 31st, 2015

Hi Folks,

yesterday Microsoft released an update to the Windows Server roadmap. Reduced to the main information it announced a new Version for Windows Server in 2016 and not in 2015.

You can read the full article from Microsoft here: Windows Server and System Center roadmap update

Cheers

Michael

Tip: Running out of storage? Slim down Windows 8.x and Windows Server 2012 R2 HDD use Part 2

Wednesday, January 14th, 2015

Hi Folks,

this is the second part of our “Slim down Windows 8.x and Windows Server 2012 R2 HDD use” series, the first part can be found here: Slim down Windows 8.x and Windows Server 2012 R2 HDD use Part 1

In this part we will get a closer look on Windows Server 2012 R2 incl. virtual Windows OS’s runinng on Hyper-V which is also available with Windows 8.1 Pro and Enterprise.


1) Compress VHD(x) files (in the right way)

You are using virtual Windows Systems together with the Hyper-V role or VHD boot to have multiple Windows systems available on a PC/Server?
VHD’s are available in different types, one is the dynamic mode and this is very common to use. Why? If you create a VHD with an size of 80GB in dynamic mode the VHD file size will be only a few MB. The VHD will increase the size everytime you add data to it and will max. grow to the defined size (in this case 80GB). But what will happen to the VHD if you remove content from it? Will the VHD size decrease? No… You need to run a compression to perform this task and most Users or Administrators are using the compression offered in the Hyper-V console. Is this a problem? For my point of view yes… In the Hyper-V console you can only run the compression for 1 VHD per Time and you have to repeats this for other VHD’s, boring right? Do you know that they are different compression types available? No? Of cause most people don’t know this because the Hyper-V console doesn’t offer any compression type selection and the “default” compression is not the most efficient one.

So what do we want to do… A simple command or script to compress all VHD or VHDX files in a folder with the best possible compression to gain the most possible free disk space. Here it is…

Attention: If using VHD(x) Boot do not use it for the used boot VHD, it will also not work for running VM’s and the current used VHD(x) files.

Command (Powershell, 1st line for VHDX and 2nd for VHD files):

Get-VHD *.vhdx | where {$_.VhdType -eq "Dynamic"} | Optimize-VHD -mode full

Get-VHD *.vhd | where {$_.VhdType -eq "Dynamic"} | Optimize-VHD -mode full

Supported by Microsoft: Yes
Require Administrator Permission: Yes
Produced space on HDD: Depends on VHD(x) use
Can be used with WIM boot installation: Yes
Disadvantage: Installed Hyper-V role is required to run the command, it will not work for VHD(x) files used by runinng VM’s. Do never use it for a VHD(x) with existing snapshots or VHD(x) files that work as parent disk for one or more differencing disks (See 2,).


2) If running multiple VM’s on Hyper-V use differencing disks

You want to run several VM’s with the Hyper-V role? You copy always your Master VHD(x) for each VM? So one 80GB Master Disk is required for 5 VM’s and you have now 480GB used on the HDD? This can be done much lower storage demand by using differencing disks. To explain this a little bit more in details.. A differencing disk (aka as fast clone/linked clone for other Hypervisors) is some sort of a snapshot, so it will take the data from the Master Disk and will add modified or added content to the differencing disk. This means if you use Windows in this way all Windows files will come from the Master Disk, if you now install office to a VM that is using a differencing disk Office will be installed in the differencing disk but the Windows OS files are still coming from the Master Disk. For my sample it means.. If i create a 80GB Master Disk and based on this Master Disk i created 5 VM’s based on a differencing disk, the differencing disk size per VM is only 4MByte at the beginning. So i don’t use 480GB like shown in the sample, i use only 80GB + 5x4MB for the VM’s, you can reduce this even more if the VHD(x) Master Disk is a dynamic expanding disk (see also 1.).

Command (Hyper-V console, no commands available to complete the full task):
– Prepare a Master Disk by installing and configure a VM (don’t forget to run a sysprep in the VM if a Windows OS is installed)
– Delete the VM but not the VHD(x) file used by the VM to prevent changes to the Master Disk in the future.
– In the Hyper-V console (right site) click on “New”->”Harddisk” and follow the assistant, important for the VHD(x) selection.. The differencing disk must be the same type as the Master Disk.
– Select “Differencing” in the Harddisk Type selection and click on next.
– Select the Path where the differencing disk should be created and type in the differencing disk name and click on next.
– Select the Master Disk and click on next and confirm the task to create the disk.
– Now create a new VM and assign the fresh created differencing disk to the VM.
– Create more differencing disks/VM’s if required.

Supported by Microsoft: Yes
Require Administrator Permission: Yes
Produced space on HDD: “Size of Master Disk” x “amount of VM’s”, applying Windows Updates to VM’s will decrease the saving by time.
Can be used with WIM boot installation: Yes
Disadvantage: Not recommended for production use by Microsoft! Do not change or delete the Master Disk or all related differencing disks will fail! I do use this only for VM’s that don’t require Windows Update (like Test environments), as more Windows Updates are installed to the VM’s based on a differencing disk as more space will be required for the differencing disks and as lower is the saving. Do never ever use this for Domain Controllers incl. CA’s / Exchange / SQL / Lync / Dynamics / Windows Storage / Sharepoint Servers, this is my personal opinion; it’s great to setup fast Test Systems / Web / Print or Terminal Server and to perform development/security audits to check/verify Software incl. load tests. Each differencing disk will highly increase the IOPS for the Master Disk, the Master Disk should be always placed on a very fast storage (SSD’s or similar).


3) Remove not used or required Windows components

We already got a closer look on the winsxs folder in Part 1 of this series, we already removed superseded files/updates but why not removing files that are not required? If you prepare a couple of Terminal Server, why should you keep files related to the IIS or the Active Directory Domain controller role in the Master Image? You’re right.. There is no reason to do this but still most Administrators are doing it.

Removing the components also reduce the Windows Update footprint because the removed components will not updated anymore.

Commands (commandline):
This command will show all available Windows components and the current use state, the command will create a feature.txt file in the folder where the commandline is executed. Why? It’s more easier to read a txt file with all these components than a simple commandline output:
DISM /online /get-features /format:table > features.txt

This command will remove a not used (active) component from the hard disk (open the features.txt file created with the first command to get the current state), in the sample i will remove DirectPlay from a Windows 8.x:
DISM /online /disable-feature /featurename:DirectPlay /remove

Commands (powershell):
If you want to remove all not active used components you can do this also with a simple powershell command, this is the hardcore way:
Get-WindowsFeature | where-object{$_.Installed -eq 0 -and $_.InstallState -eq 'Available'} | uninstall-windowsfeature -remove

Supported by Microsoft: Yes
Require Administrator Permission: Yes
Produced space on HDD: Depends on amount of removed features
Can be used with WIM boot installation: Yes but mostly useless. Installing a component again will increase used space for drive c:
Disadvantage: Removed roles and features can not be installed without an external winsxs folder source once the files are removed/the above commands are executed. Execute the powershell command to remove all not used components only when you are really sure that you have finished the component setup for this system.

4) The simple way… Use the Microsoft Disk Cleanup Tool

In Part 1 i forgot to mention the “basic” tool, the default disk cleanup tool coming with Windows.

Commands (commandline):
cleanmgr.exe

Supported by Microsoft: Yes
Require Administrator Permission: Yes
Produced space on HDD: Depends on current data hold in Windows
Can be used with WIM boot installation: Yes
Disadvantage: Removed log files/data is not available anymore and maybe need to be recreated or can not be used for future troubleshooting as example.

This is the end of Part 2, maybe there will be a Part 3 (dealing with low-end tablet/low storage mobile cloud clients) but this depends on the available time and future ideas how to slim down a Windows.

Cheers

Michael

P.S.: No warranty at all, if you have no idea what iam talking about don’t use any of these solutions. Don’t blame me if you crash your system.. Dealing with Windows and the components can be always tricky.
Tip: Fix Windows Server 2012 R2 Update issues after moving to core mode

Tuesday, January 13th, 2015

Hi Folks,

this issue happens sometimes for me, Windows Server 2012 R2 is a cool product and a couple of Administrator are using it in core mode. This is quite easy because you can switch between core and GUI mode quite simple now.

The pain starts if you have installed some Apps in GUI Mode, as example Microsoft Silverlight and than you switch to the core mode. Why? Windows can not use Silverlight in core mode and related roles/applications are not available in the core mode. When it now comes to Windows Updates it still download Silverlight related updates but this will cause in error during the update installation (the related Applications are not available…).

This is caused thru the winsxs folder and the available packages/components hold in this folder, so we need to repair it.

Just try to run the following command:

Dism /Online /Cleanup-Image /RestoreHealth

Once the command is finished the issue should be gone and Windows Update should run fine now.

Cheers

Michael

P.S.: If the issue is not gone check in c:\Windows\Logs\DISM\dism.log if you receive any other information related to the issue.

Tip (Updated): Running out of storage? Slim down Windows 8.x and Windows Server 2012 R2 HDD use Part 1

Monday, January 12th, 2015

Hi Folks,

you run several Windows 2012R2 Servers or Windows 8.x VDI’s? You have Windows devices with small HDD’s/SSD’s? You run out of storage or you want to reduce the Windows Footprint in general?

Here are some supported and unsupported steps you can do… “Can be used with WIM boot installation” points to the new Install Option for OEM Vendors, mostly used for Windows 8.1 with Bing and low SSD devices. For a WIM boot description get a look here: WIM boot explained

1) Disable Hibernation

Hibernation could be usefull but I see mostly that Users are using the sleep/standby mode. The difference between the sleep/standby Mode is quite simple to explain. In standby mode the computer hold the current RAM state in the RAM and consume still some power, in hibernate Mode the RAM content will be placed on the HDD/SDD and the computer really shutdown. The disadvantage in this case is quite simple, it always consumes 75% of the total ram size with a file called “hiberfil.sys” on drive C:. So if you don’t need the hibernate mode, disable it…

Command (command line):

powercfg -h off

Supported by Microsoft: Yes
Require Administrator Permission: Yes
Produced space on HDD: 75% of the total RAM Size
Can be used with WIM boot installation: Yes
Disadvantage: Hibernation mode is not available

2) Remove superseded Updates/Windows files

Windows by design increase the used amount of HDD Space.. By default all installed Windows updates and also the old original files will be hold to roll back the updates. So if you have an old Windows System and you run Windows Update all the time, all this files will be hold and consume a lot of HDD space. You can remove this old stuff quite simple, this should be done everytime you create a golden image or after you run Windows Update…

Update: I’ve been asked if this is similar to the Windows Update clean up provided by the Windows disk clean up tool. No it’s not similar and will provide more free space as extension to the disk clean up tool

Command (command line):

dism.exe /online /Cleanup-Image /StartComponentCleanup /ResetBase

Supported by Microsoft: Yes
Require Administrator Permission: Yes
Produced space on HDD: 0->4GB depending on how much Windows Updates applied
Can be used with WIM boot installation: Yes but smaller effect.
Disadvantage: Windows Updates can’t be rolled back in case of issues, test the Windows before you roll-out it.

3) Compress the “winsxs” and some other Windows folders (UNSUPPORTED!)

Windows comes with a sub directory called “winsxs”, this is one of the most important Windows folders because this folder holds all Windows Installation Files and a lot of active used Windows Files are pointed to the files in the “winsxs” folder. This folder requires a lot of space and it could make sense to compress it if possible. By design this task is not simple to do and we need a more complex script to do it. You can also compress some other folders like the Fonts directory without any issue in the same step.

I use this script since a long time (> 12 Months) now and with a couple of test / low storage system’s like my Surface Pro, until now i never got an issue but i don’t recommend to use this in any Windows Server production environment.

Commands (command line, save as wincompress.bat):

echo Compress Windows folders
compact /s:"%WINDIR%\Fonts" /c /a /i *
compact /s:"%WINDIR%\Temp" /c /a /i *
compact /s:"%WINDIR%\Web" /c /a /i *
compact /s:"%WINDIR%\assembly" /c /a /i *
compact /s:"%WINDIR%\debug" /c /a /i *
compact /s:"%WINDIR%\LastGood" /c /a /i *
compact /s:"%WINDIR%\ShellNew" /c /a /i *
echo Compress winsxs folder
icacls "%WINDIR%\WinSxS" /save "%WINDIR%\WinSxS.acl" /t
takeown /f "%WINDIR%\WinSxS" /r
icacls "%WINDIR%\WinSxS" /grant "%USERDOMAIN%\%USERNAME%":(F) /t
compact /s:"%WINDIR%\WinSxS" /c /a /i *
icacls "%WINDIR%\WinSxS" /setowner "NT SERVICE\TrustedInstaller" /t
icacls "%WINDIR%" /restore "%WINDIR%\WinSxS.acl"

Supported by Microsoft: No, support is lost! (You use the script on your own risk!)
Require Administrator Permission: Yes
Produced space on HDD: ~3GB-5GB
Can be used with WIM boot installation: No, never use it with a WIM installation! Why? The files in the winsxs folder in a WIM boot installation are mapped from the recovery partition. If you compress now the files the files will be shifted/written into the Windows partition and this will highly blow up the used space.
Disadvantage: System requires some CPU resources to handle the compressed files, system is now without any support from Microsoft. Do never abort the script once running, run it only with a 100% stable system! Script needs some time to run… If running on a physical hardware create a recovery partition on a USB Memory in advance: How to create a recovery partition on a USB memory or create a snapshot if used with a VM. Once the script is finished you will receive always a message that the script execution failed for one file, this is by design and no issue at all.
This is Part 1 of this article, Part 2 can be found here: Slim down Windows 8.x and Windows Server 2012 R2 HDD use Part 2


Cheers

Michael

P.S.: Figures shown as produced savings are max. savings, on a fresh installed windows the savings will be lower.

Tip: Fixing Windows 8.1 Pro or Windows 8 Pro Workfolder sync errors 0x80072ee2 and 0x80c80203

Sunday, December 14th, 2014

Hi Folks,

you are using the Workfolder feature with Windows 8.1 Pro or Windows 8 Pro incl. Enterprise? For a few devices the download sync works fine but uploading files result in the error 0x80072ee2 or 0x80c80203? (Error codes can be reviewed in the Eventlogs->App and Service Logs->Microsoft->Windows->Workfolder).

These errors can happen if you are using the Hyper-V Role coming with Windows 8.x Pro and Enterprise, a virtual Switch is assigned to the WiFi Card and you are using the WiFi connection for the Workfolder sync. To fix it just remove the Virtual Switch thru the Hyper-V console and retry the sync, it should work now.

You can also receive other errors.. Like unstable Remote Desktop connections as example.

Cheers

Michael

P.S.: Other reasons for a failed sync could also be possible, but this is currently the main reason that i found. Connections thru a Hyper-V Virtual Switch assigned to a regular ethernet card could not be reproduced during my tests.

Tip: Free space after a lot data has been deleted/moved from a Windows Server 2012 (R2) volume with enabled deduplication

Sunday, September 14th, 2014

Hello Folks,

the last day’s i setup a new design for a storage infrastructure, in this infrastructure i’ve moved/deleted round about 6TB of data.

On some volumes was/is deduplication enabled and after i’ve moved a bunch of data away from these volumes to free diskspace the Windows Explorer still shows no “new” free space available. By default Server 2012 and R2 will free diskspace one time per week or with other words you will not get free diskspace by only deleting a file; quite simple.

So how can you force Windows Server 2012R2 to free the diskspace asap? Quite simple, start the PowerShell as Administrator and run the following command:

Start-DedupJob -Type GarbageCollection -Priority High -Volume *yourvolumehere*

After you start the job you can check the status with Get-DedupJob

Wait until the job is finished and check the free space again, it should be available now. I will not explain why deduplication is working in this way here but I did note sometimes Administrators are not aware about the way how it works and that’s the reason why i mention it here.

This is also important if using data deduplication for portable harddisks (not recommended to do so), i’ve seen this already a few times and in this case you are required to run this job manual (mostly).

Have Fun

Michael

P.S.: If you run full backup jobs on a volume like this Microsoft recommends to create a new full backup after the “GarbageCollection” Job is finished, a lot of data can be changed during this job.

P.S.2: For infrastructure’s with a high rate of moving/deleting data on volumes with enabled data deduplication i recommend to schedule one “GarbageCollection” Job per night for the affected volume. You can schedule a job quite simple with the command: Set-DedupSchedule –Name "FreeSpace" –Type GarbageCollection –Start hh:ss –DurationHours 5 –Days Mon,Tues,Wed,Thurs,Fri,Sat,Sun –Priority High

Of course the execution time should not be at the same time like a large backup job or similar.. 🙂 Replace hh:ss with the time you want to perform the job, also remove unwanted days if not needed.

Tip: Microsoft Workfolder Sync fails with error 0x80080222

Saturday, September 6th, 2014

Hi Folks,

i just got the issue with a tablet (Windows 8.1), i boot up the tablet and got a sync error from the Workfolder feature.  The error number was 0x80080222, after a research i did not found much information’s about this error. Typical it means that something with the licensing failed but all Servers incl. the tablet didn’t show any license issue and were still activated, also other devices still got no issues and worked without any error.

Funny… Only difference to the working devices was the fact that the workfolder file location was stored on a SD-Card (to save rare SSD space) and i remember that i remove the card a few hours before (device was off) to copy a file from it (not from the workfolder file folder…). So i tried to reproduce it and yep.. Same happens again, so it seams to be that the workfolder feature checks the filesystem and if something is wrong it denies to work anymore. 🙁 No workaround, just stop the use of workfolders and set it up again to get it working. Quite simple and don’t waste your time for troubleshooting.

Cheers

Michael

P.S.: Similar can happen with regular HDD’s/SSD’s if removed from the device and attached to an other one (to take a backup or whatever). I would like to get a more detailed error description or a hint at Microsoft TechNet but i did not found any article related to the issue.

Tip: Nice article how to setup a Nutanix environment with Microsoft Hyper-V

Wednesday, June 11th, 2014

Hello Folks,

i found a very nice article how to setup a Nutanix environment together with Microsoft Hyper-V here, maybe you will like it too… 🙂

Nutanix Hyper-V Cluster
Cheers

Michael

Tip: How to add Broadcast Driver Architecture (BDA) support to Windows Server 2012 R2

Saturday, May 24th, 2014

Hello Folks,

for a project i needed to use a DVB (TV Card) device together with Windows Server 2012 R2.

One big issue here is that Server 2008/2012 (R2) do not support BDA devices out of the Box, so you can install the TV Card drivers, Direct X, and Codecs but you can never use this device thru the lack of the BDA support at all. I don’t know why Microsoft doesn’t offer the support as feature but who cares…

After some researches i found a very cool blog here: How to: Add BDA Hardware Support to Server 2012 R2.

I downloaded the package and after the Installation it works like a charm for me.

Great work, thanks for sharing this!

So if you also need to use a DVB-T/C card or USB device with Server 2012 R2 try it out and follow the instructions mentioned in the blog article.


Cheers

Michael

P.S.: Of course this solution is not supported by Microsoft… 🙂

Tip: Where are my Windows Store Apps and Data located on my local Harddisk

Saturday, April 12th, 2014

Hello Folks,

a few times i’ve been asked where the Windows Store Apps located incl. the data for Apps (Savegames, configuration files and so on).

So here are the locations for these files:

Binary Application Data: C:\Program Files\WindowsApps
Configuration Data: C:\Users\*User Name*\AppData\Local\Packages

Check the subfolder names in these directories, it should be easy to identify the App folder that you are looking for.

If you want to backup your configuration data or maybe save games just backup the configuration data folder, you can also copy this folder to an other device, i never got an issue by doing this and I’ve done this a few times for Apps which don’t offer a “Sync” option thru Microsoft One Drive.

Please note: These folders are hidden and you need Administrator permissions to modify these folders. Do also note that you never remove an Windows App by deleting just the folder in C:\Program Files\WindowsApps, this will never be enough and can create major issues for this App.

Cheers

Michael

Release: Windows 8.1 / Server 2012 R2, Windows RT 8.1 Update and SQL Server 2014 are now available in the MSDN

Thursday, April 3rd, 2014

Hello Folks,

you can now download the Update for Windows 8.1 / Server 2012 R2 and Windows RT 8.1 in the Microsoft MSDN (MSDN Account required), also SQL Server 2014 RTM is available now in the MSDN.

Cheers

Michael

P.S.: It’s named as Update and not Update 1 🙂

Tip: Fixing IGEL Linux V5 issues with none RemoteFX capable Remote Desktop Services

Saturday, March 15th, 2014

Hi Folks,

if you have issues with the new IGEL Linux V5 and none RemoteFX capable Remote Desktop Services (Windows 2008 and older or Windows 7 without SP1 and older) you can fix the issue in two ways:

1) In RDP->RDP Global disable RemoteFX (similar for sessions if the global configuration is not used)!

2) or enable the Legacy RDP Client in RDP->RDP Global->Option, make also sure that RemoteFX is disabled!

If you not perform one of these steps a connection from the client can have a impact for all connected RDS Users (EventID 1503 and other on the Server). Please note that the new IGEL Remote Desktop Service Client is not really designed to work with such old systems like Windows 2003 or similar!

RemoteFX capable are: Windows 2012 (incl. R2), Windows 8 (incl. 8.1), Windows 2008 R2 and Windows 7 SP1, RemoteFX needs to be enabled/configured thru Policies! Windows 2008 R2 in general can not use RemoteFX USB Redirection and a Windows 7 SP1 VM needs to have a RemoteFX GFX Adapter assigned in the Hyper-V console to redirect USB devices. USB Redirection means USB Port to Server redirection and not Printer or USB Memory mapping, only to be clear here… 🙂

Cheers

Michael

Tip: Fixing Windows Store 0x80240017 Error thru Power Shell

Monday, March 10th, 2014

Hi Folks,

i already written two Blogs about the Windows Store and how you can fix issues there…  If these solutions doesn’t help you to fix the Windows Store Error 0x80240017 than you should try this one for the following scenario.

If you run into the scenario that you get a 0x80240017 Error during a App Update or new Installation or a installed App is not shown in the Startmenu and you can’t uninstall or re-install the app try the following solution:

1) Open the Powershell with Adminrights (in Windows Search look for Powershell and click with the right mousbutton on it, select “Run as Administrator”
2) Type in “Get-AppxPackage -Name *part of the appname*
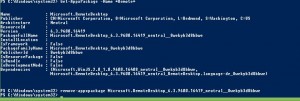
3) You should get a result like shown in the Package (sample is for the Remote Desktop App)

appstorepowershell4) Now enter the command remove-appxpackage *PackageFullName for the previous executed GetAppxPackage command (see also screenshot)
5) Open the Windows Store and try to re-install the app again, a reboot is not required.

This solved the issue for me a couple of times…

Cheers

Michael

Release: Microsoft Office 2013 SP1, Microsoft Exchange 2013 SP1 and Sharepoint 2013 SP1

Wednesday, February 26th, 2014

Hi Folks,

yesterday/today Microsoft has release several Service Packs containing Updates, new Features and Optimizations for Microsoft Office 2013, Exchange 2013 and also Sharepoint 2013, you can download the Service Packs here:

Microsoft Office 2013 SP1 32Bit: Download
Microsoft Office 2013 SP1 64Bit: Download
Microsoft Exchange 2013 SP1: Download

Office for Windows RT based devices will also receive an update thru Windows Update which is already available.

There are currently no product ISO Files available on MSDN that already contains the SP1, so currently you are required to download/intall the SP1 seperate or to deploy it thru Windows Update or a WSUS Server.

Cheers

Michael